
Acdc Pump, AC220V DC72 550watt Brushless Pmsm Solar Water Pump Jet Pump, Cpm, Sgj Pump, Save 30% Electricity
Model NO.: AC DC JET PUMP 550watt
Power: Solar Energy
Start Up: Magnetic Pump
Type: DC Pump
Application: Clean Water
Industry: Solar Water Pump
Media: Solar Water Pump
Performance: Powerful Pump
Theory: DC Pump
Trademark: Mr. Pumpboy
Transport Package: Plywood Case
Specification: 87*32*13
Origin: China
HS Code: 8413709190
Warranty: Â AC/DC3 Year for motor and controller. Solar panel 20 years(Optional)
Â
Installation
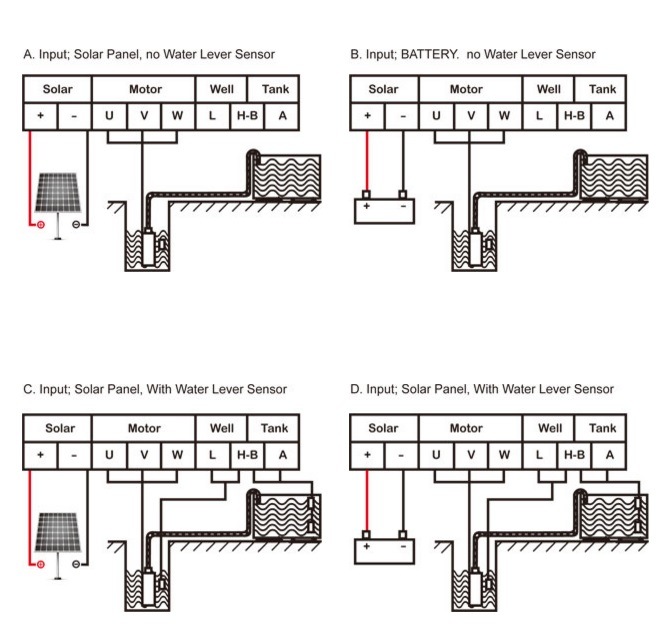
 1. Wiring the pump
 Connecting a longer cable to the pump,(size of cable must be at least 1.5mm²)
Use the parts contained in the cable connector kit( heat-shrink tube and tape) to connect a longer supply wire to the pump. If you don't have a heat gun to shrink the tube, the barrel of your soldering iron will do or you can use a butane torch but with great care so you don't melt the insulation or set it on fire. Bare the insulation back as shown above.
A. Layout the components needed to make the joinÂ
B. Put the large diameter piece of heat-shrink over the main cable and then the smaller diameter pieces over the individual wires, keep the heat-shrink back away from the joints as you solder them. Any heat transfer will prematurely shrink the heat-shrink.
C.  Slide the small heat-shrink over the soldered joints and heat using a heat gun or alternative heat source to shrink the sleeve down over the wires.
D. Wrap the tape over the sealed joints
E. Finally slide the large diameter heat-shrink over the completed joint and shrink to it.
Place the pump in water before you start wiring the controller box this will allow the pump to go through the pre-conditioning required. Do not put the pump in its final position until you have tested it, unless it is easy to see and remove.
Â
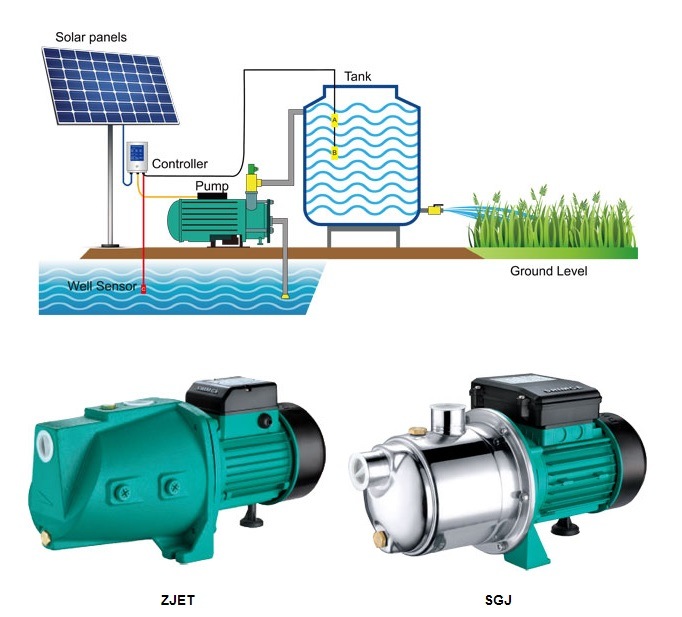
- Solar pump control box
  B. over-current protection( it is automatic)
  C. protection for low water level in well( A B sensor)
  D. protection for full water level in tank( L H sensor)
  E. Controlling running speed of motor( speed regulator)
  F. Delay working when full water in tank( a timer inside can delay working for 30 seconds when the tank going to not full)
  G. MPPT function.(maximum power point tracking)
  H. Battery is optional.( battery can be used with solar charger battery system)


 Warranty:  AC/DC
3 Year for motor and controller. Solar panel 20 years(Optional)
Â
Installation
 1. Wiring the pump
 Connecting a longer cable to the pump,(size of cable must be at least 1.5mm²)
Use the parts contained in the cable connector kit( heat-shrink tube and tape) to connect a longer supply wire to the pump. If you don't have a heat gun to shrink the tube, the barrel of your soldering iron will do or you can use a butane torch but with great care so you don't melt the insulation or set it on fire. Bare the insulation back as shown above.
A. Layout the components needed to make the joinÂ
B. Put the large diameter piece of heat-shrink over the main cable and then the smaller diameter pieces over the individual wires, keep the heat-shrink back away from the joints as you solder them. Any heat transfer will prematurely shrink the heat-shrink.
C.  Slide the small heat-shrink over the soldered joints and heat using a heat gun or alternative heat source to shrink the sleeve down over the wires.
D. Wrap the tape over the sealed joints
E. Finally slide the large diameter heat-shrink over the completed joint and shrink to it.
Place the pump in water before you start wiring the controller box this will allow the pump to go through the pre-conditioning required. Do not put the pump in its final position until you have tested it, unless it is easy to see and remove.
Â
- Solar pump control box
  B. over-current protection( it is automatic)
  C. protection for low water level in well( A B sensor)
  D. protection for full water level in tank( L H sensor)
  E. Controlling running speed of motor( speed regulator)
  F. Delay working when full water in tank( a timer inside can delay working for 30 seconds when the tank going to not full)
  G. MPPT function.(maximum power point tracking)
  H. Battery is optional.( battery can be used with solar charger battery system)
Â
Colored Glass Filter,Electrostatic Filter ,Filter Element ,Water Filter
Metal Window,Prism Co., Ltd. , http://www.nbcameralenses.com